

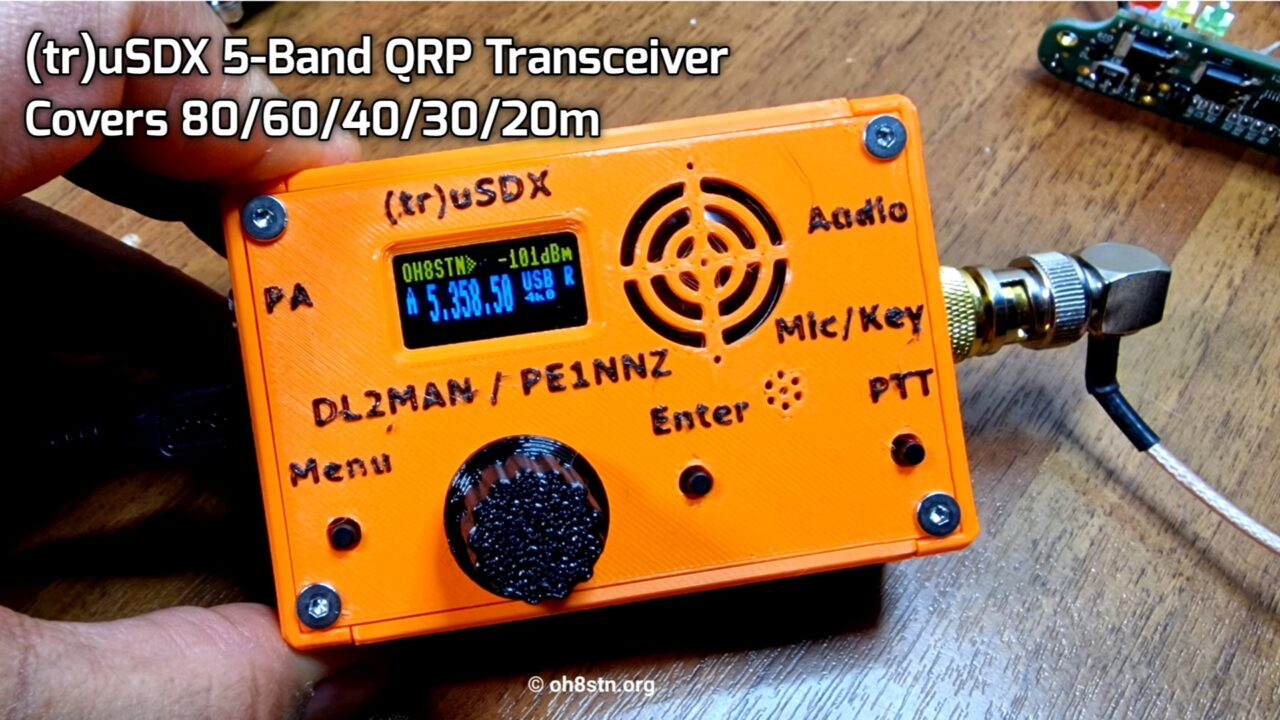
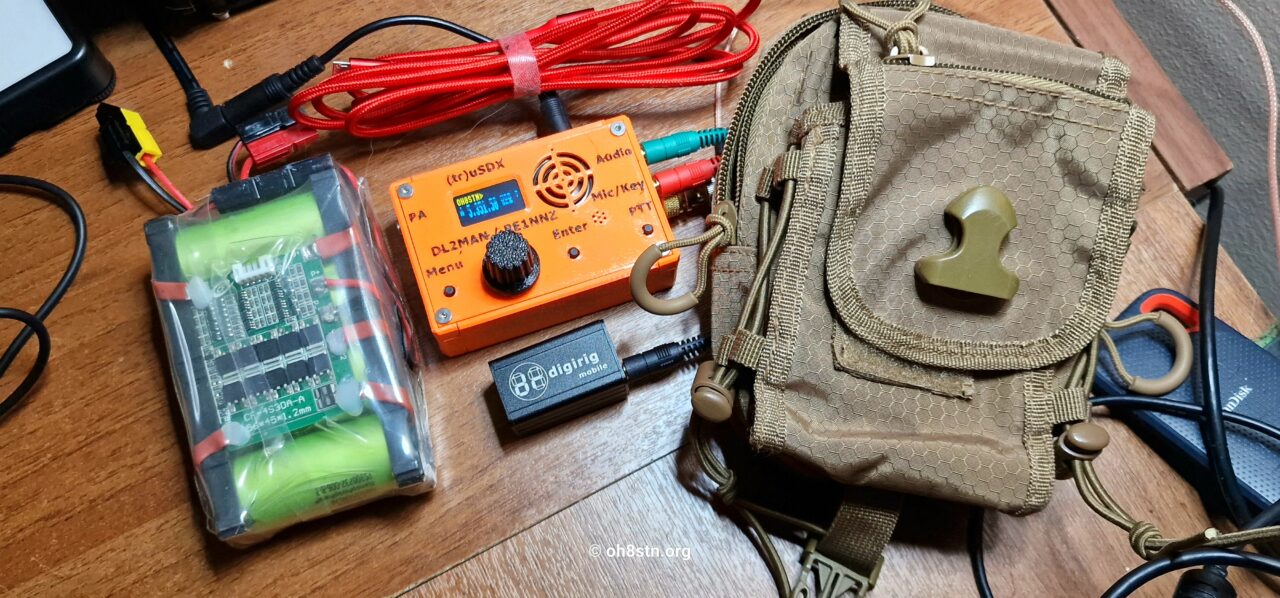
The (TR)uSDX is a budget-friendly HF radio covering the 80, 60, 40, 30 & 20 meter bands. Add a Digirig & tablet computer to it, and guess what you get? A budget friendly data modes go kit, for off grid ham radio!
Hello Operators.
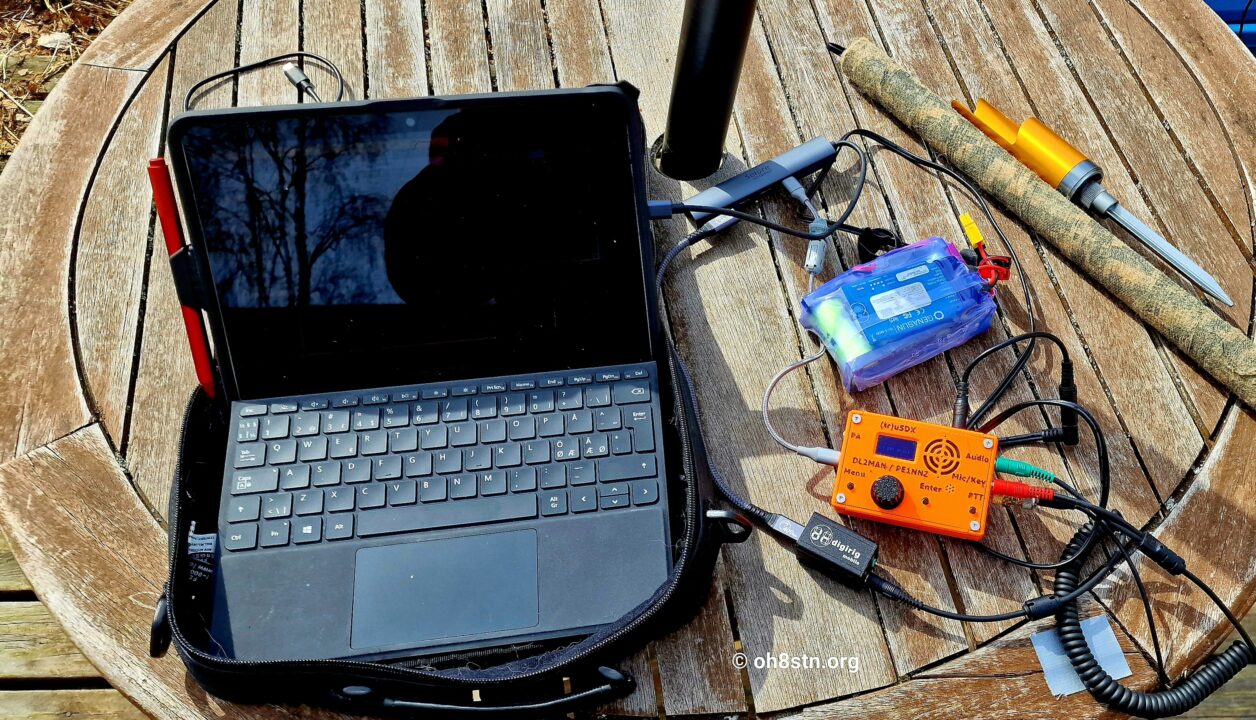
While working on my next video, I often like to take a break to write about things in the pipe. Today we are talking about a budget-friendly survival radio go kit. One which is NVIS capable, supports HF Data Modes, and useful for off grid ham radio or even during a grid down disaster. For this data modes go kit, I chose the (TR)uSDX, Digirig Mobile, and a second hand Microsoft Surface Go 2 LTE. Naturally, it is not that simple. Let’s move on!
Requirements
Unlike traditional Ham Radio taking place on the DX bands eg 20, 15, & 10 meters, regional communications for EMCOMM, Survival Radio and preparedness are often best carried out on 80, 60, & 40 meters. These bands are selected because of their NVIS capabilities. NVIS stands for Near Vertical Incidence Skywave. This is a method of operation allowing station to station connections, in the local to regional range. Most often, Ham Radio is associated with DX communications. DX means stations very far away. NVIS allows us to reach stations in the area, over the horizon, or in the region out to about 350 miles or ~560km, without repeaters or other infrastructure. Our requirements are designed to take advantage of NVIS propagation, and our equipment must support it.

These requirements have come from a community of viewers finding difficulty in justifying the expense of getting into HF radio. The Ham Radio exams, the thousands of dollars/euros in radio gear, and the hours, days, months spent honing our skills is an investment in both time and money! So here is my first attempt at a budget friendly data modes go kit, with emphasis on the BUDGET & NVIS communications.
Keep in mind, the dollar amount is based on a realistic “minimum price” for getting a system that is actually useable. It is certainly possible to reduce the costs by choosing different gear. However, we may end up neutering our HF capabilities, if not careful.
Ultimately, capability is the greatest importance. It doesn’t matter how cheap our gear is, if its cost restricts capability. Remember “Minimize Gear, Maximize Capabilities“? If we follow this principle, we can surely build something reasonably capable of doing what we need it to do. When we put budget over capability during the planning stage of a go kit, we may end up with a system which achieves less than our requirements demand. Think about functionality and capability first, then decide how to pay for it!
The goal here is a molle-pouch portable HF NVIS system. It will be used for regional group communications using Winlink, JS8Call WoAD, & VARAC. The kit will primarily be used on 80, 60 & 40 meters.
Total budget $1000 USD including:
- Cost must include:
- Rig, Computer, Power supply, audio interface, and antenna
- The radio must be capable of HF NVIS communications on 80, 60, & 40 meters
- Additionally 30 & 20 meters coverage for CW, Phone & data.
- Modes SSB, Data & CW
- Data mode support for VaraHF, PACTOR, Robust Packet, VarAC, JS8, FT8, MFSK,…
- The kit should include a resonant antenna, which is lightweight, and packs small
- No antenna tuner should be required
- The kit or its power supply can be recharged in the field.
- All components should fit in a small molle pouch which can be integrated with a larger pack or case.
Cost reduction
It is also possible to reduce costs by buying the radio in its kit form. This knocks off $40 USD from the price. Another means of cost reduction, is building the antennas ourselves. Moreover, choosing a different computer can also reduce the cost of this projects completion.
HF Radio
I chose the (TR)uSDX because it is low cost, has a reasonable receiver, and also has a ridiculously low current consumption of ~80mA on RX, and 500mA on TX @13,8V with a PA efficiency of ~85%. The (TR)uSDX also covers 3 NVIS bands, and is small and easy to power. It even has an amplifier port to trigger PTT on your favorite portable amplifier, if you wanted to use one. More importantly, the (TR)uSDX can do Winlink, without the double sideband nonsense of other QRP kits!
For many newcomers to survival radio on HF, it is difficult to grasp the concept of a 5 watt radio, connecting to a station eg hundreds or thousands or kilometers/miles away. These connections are being made with a radio having the same output power as a Baofeng handheld.
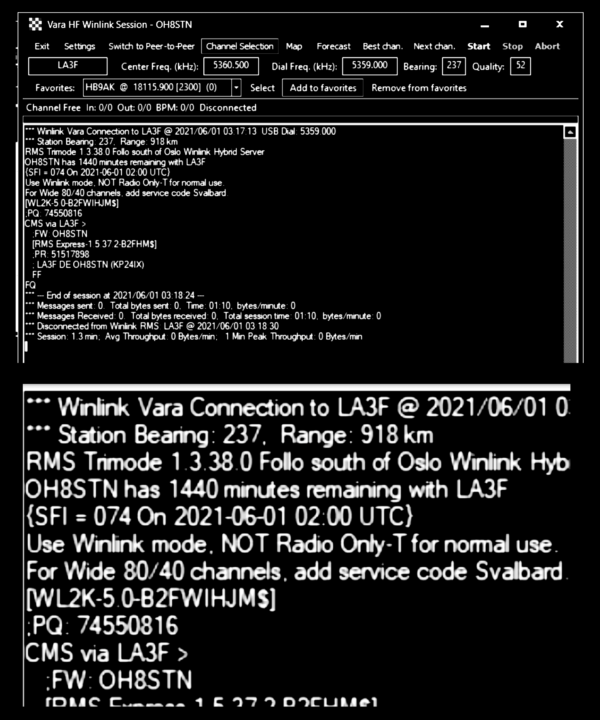
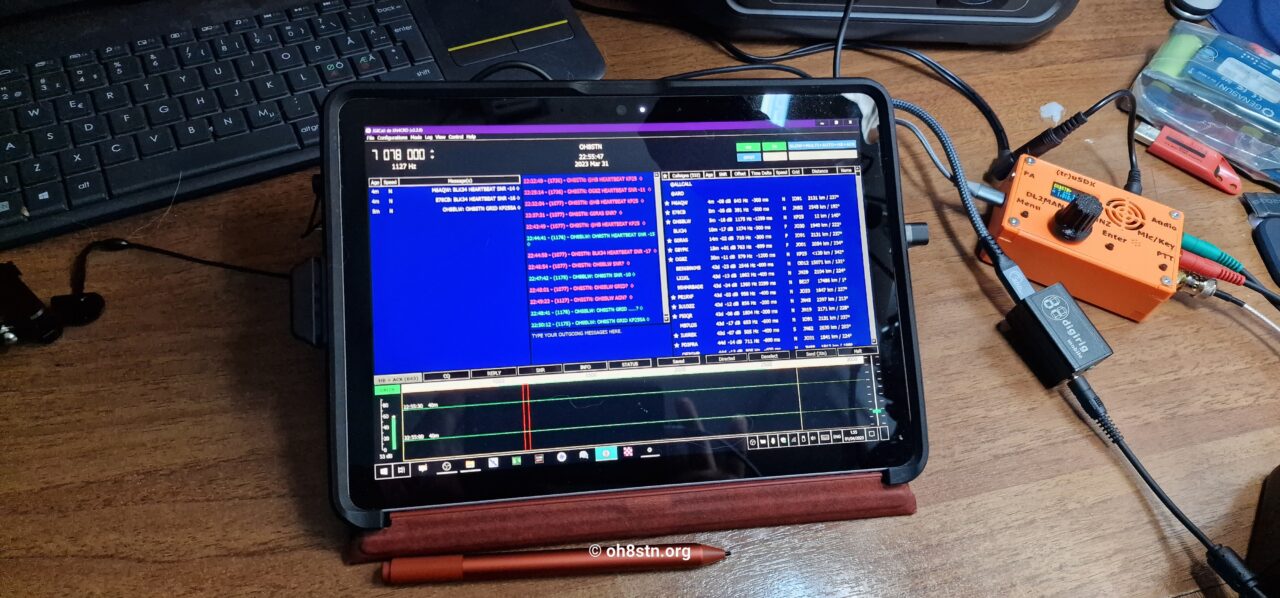
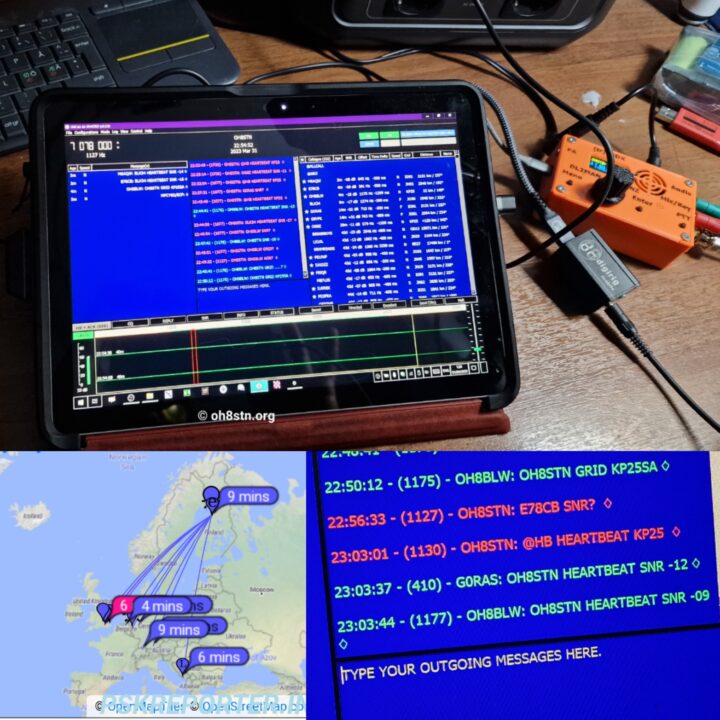
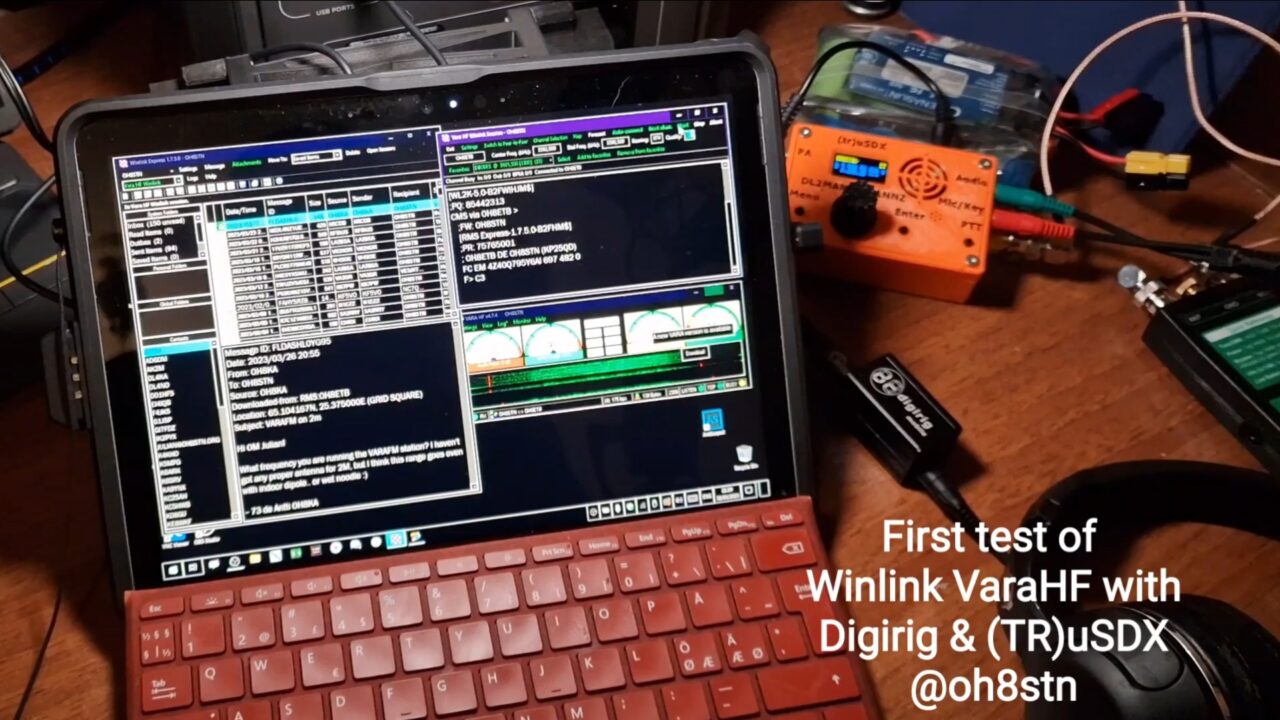
In the Winlink sessions log window next to this text, the station I’m connecting to is 918km or 570 miles away from my operating location. Considering this is being done with an HF radio, costing less than a dinner and a movie, it’s rather amazing.
The power of combing a budget-friendly HF radio with narrow-bandwidth asynchronous data modes, opens up new avenues for man-portable HF communications. HF comms without leaving important gear behind! The entire station presented in this article, is a fraction of the weight of other mostly costly (and more capable) alternatives.
Normally I would have chosen a radio with integrated audio interface There are a couple out there, but they start at roughly $400 USD. If we are going to add a capable tablet to run our data mode apps, we will need to bring the cost of the radio down to less than $150 USD. This will leave us $850 USD for a tablet or laptop based computer, running either Windows, MacOS, or Linux (You decide).
More on Data modes
Another reason for choosing the (TR)uSDX is its compatibility with various multi-tone data modes. For example, QRP-Labs released the QDX, which is only capable of data modes like JS8Call, FT8, with a very narrow bandwidth data stream. This means the neutered QDX is a no-go for modes like Winlink, VARAHF, Robust Packet, PACTOR, MFSK, ..! The (TR)uSDX/Digirig combination doesn’t have any data mode limitations. So there is no need to hold ones breath for a QSX!
There is also a problem with older QRP radio kits from QRPGuys. Some refer to the problem as “DSB transmission” (Double Sideband TX). This problem allows a transmitter to TX on both sides bands while transmitting. These radios are bad practice and shouldn’t be used, even if they are cheap!
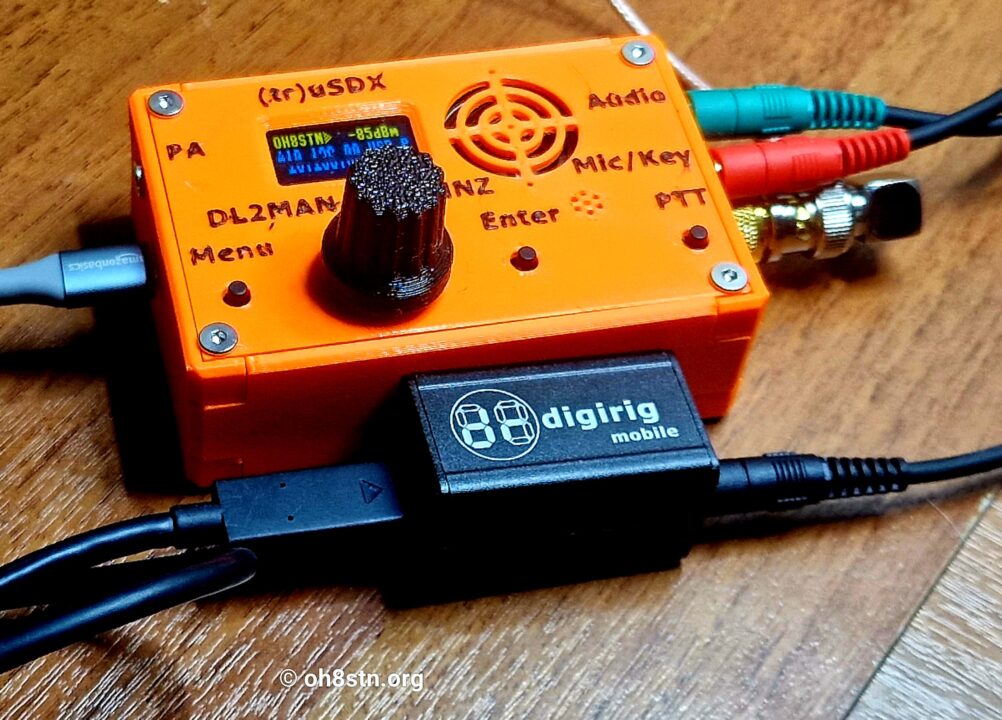
Digirig & (TR)uSDX
For the audio interface, I chose the Digirig Mobile. Although I have reviewed and recommended other audio interfaces in the past, there is no reason to waste our money on anything else for man-portable field work. The quality, cabling, modular design, OS compatibility, and extremely small size make this an excellent device for integration into our portable HF projects.
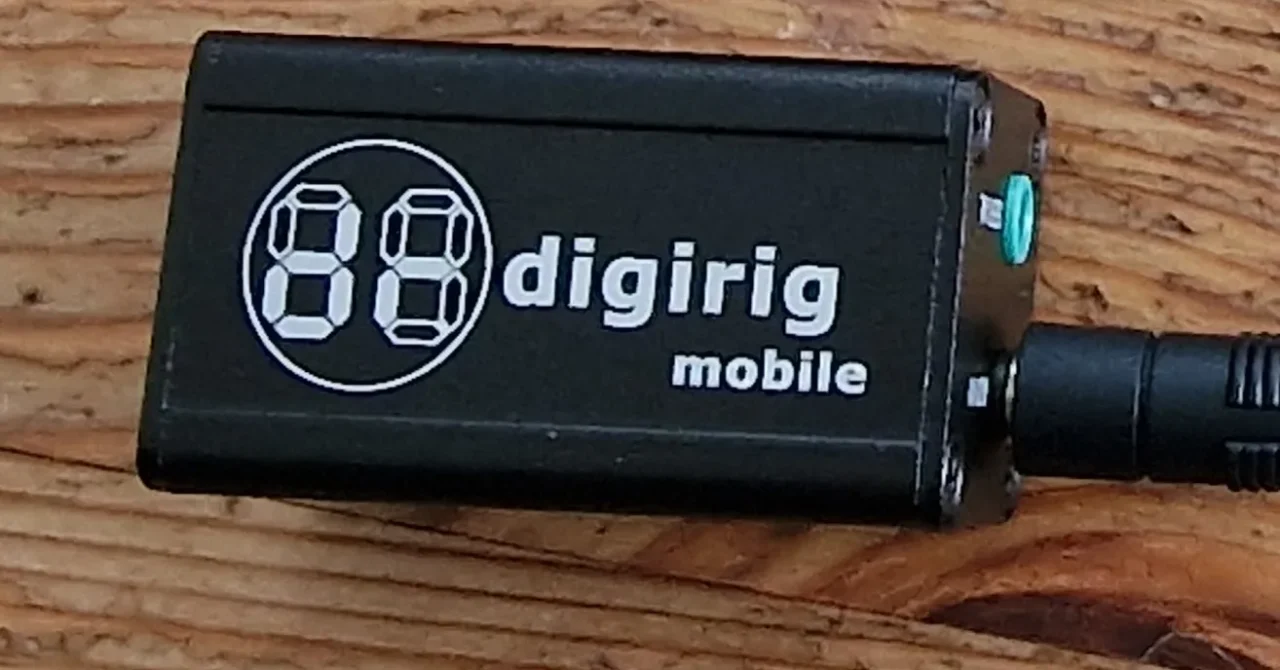
These days, my audio interface of choice is the Digirig Mobile. I’ve used it with the Kenwood TMD-700 on VHF, the Xiegu X5105 on HF & 6m, Xiegu G90 on HF, and with the Yaesu FT-81x on HF and VHF, all with great success. The Digirig design is a modular one. This allows us to use the interface with multiple rigs, by just by swapping out the cables. For those wanting an ultra compact enclosure, there is a 3d printed enclosure version for the Digirig, available on thingiverse.
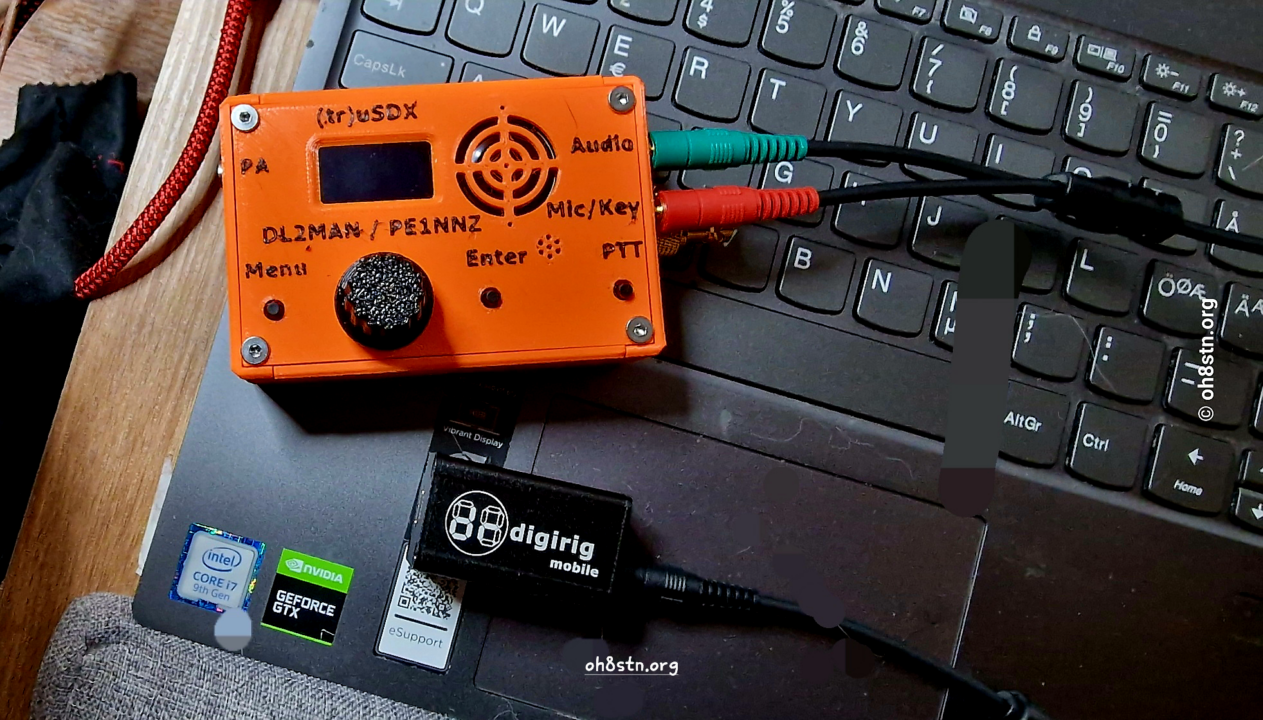
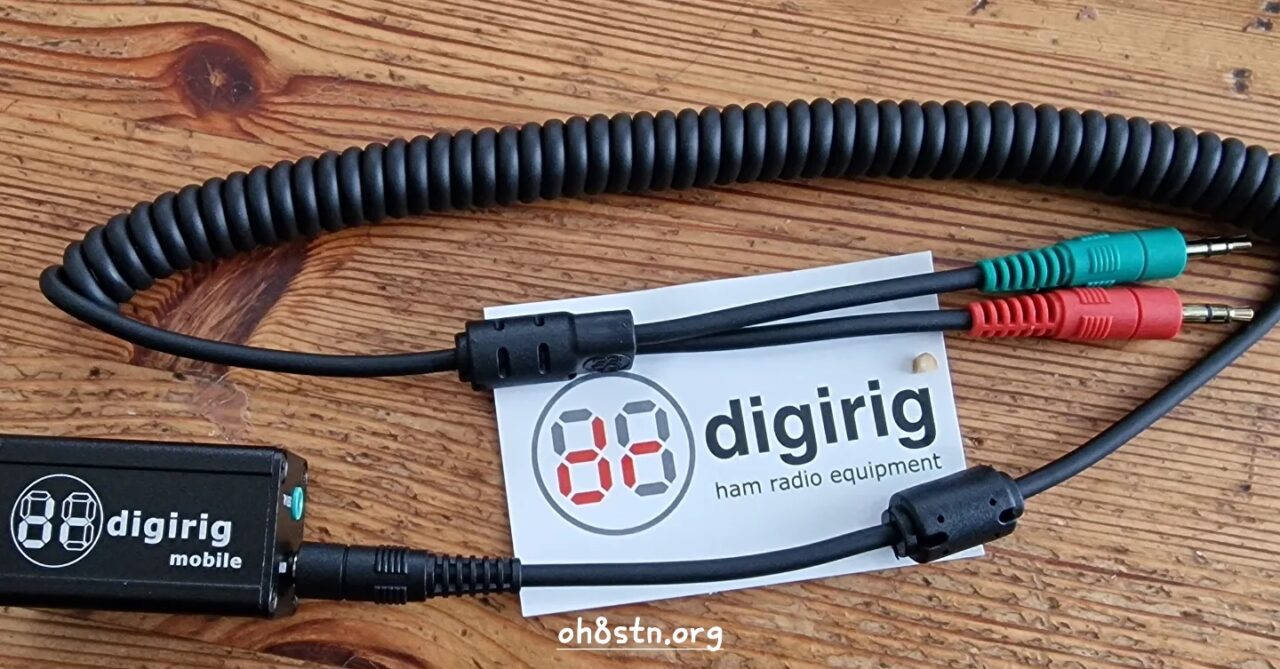
For most radios, the Digirig provides a single USB-C cable for both audio and CAT control. For the (TR)uSDX, there will be one cable coming from the (TR)uSDX itself, while another comes from the Digirig. This wire mess happens because the (TR)uSDX uses a USB port for CAT control. The USB port is a good thing, but without an internal audio interface on the (TR)uSDX, it inadvertently creates a wire mess situation for us. For radios with a traditional CAT control port, there will be a single cable between the Digirig and computer.
Many operators don’t see the point of the Digirig. Instead, these Operators prefer diy cables using the computers internal soundcard, or a simple external USB sound card. Either way, the results aren’t always nice for the rest of us. We have all heard them on air. Wide, over-driven signals wiping out communications for everyone else in the band pass. This because their audio levels are very difficult to get dialed in. Or the OS notifications transmitted out over the air. Sure the USB sounds cards can work! When they don’t, we have forced to listen to the garbage transmitted over the air.
The Digirig manages PTT, it also remembers its audio levels, even if you remove it from the computer, then plug it in again. Once it is set up, it is a fire and forget system. For everyone who doesn’t have a built in audio interface on their radio, consider adding a Digirig Mobile in your toolbox!
Data modes
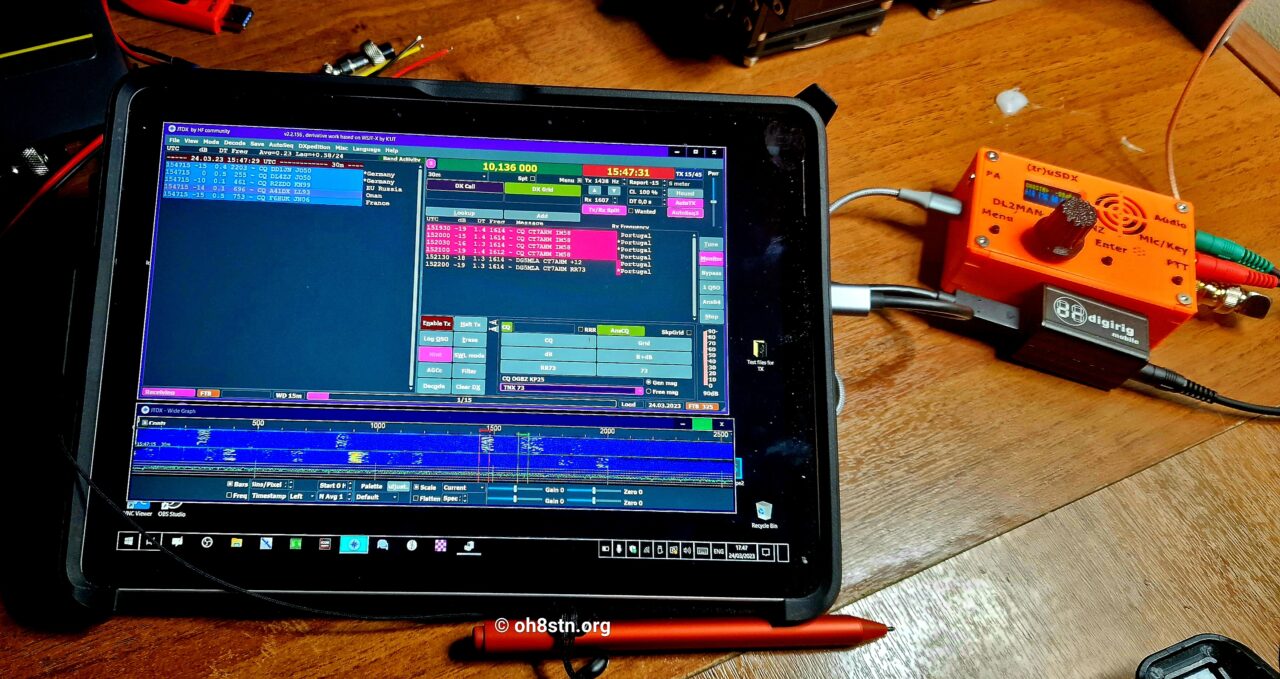
Running JS8Call
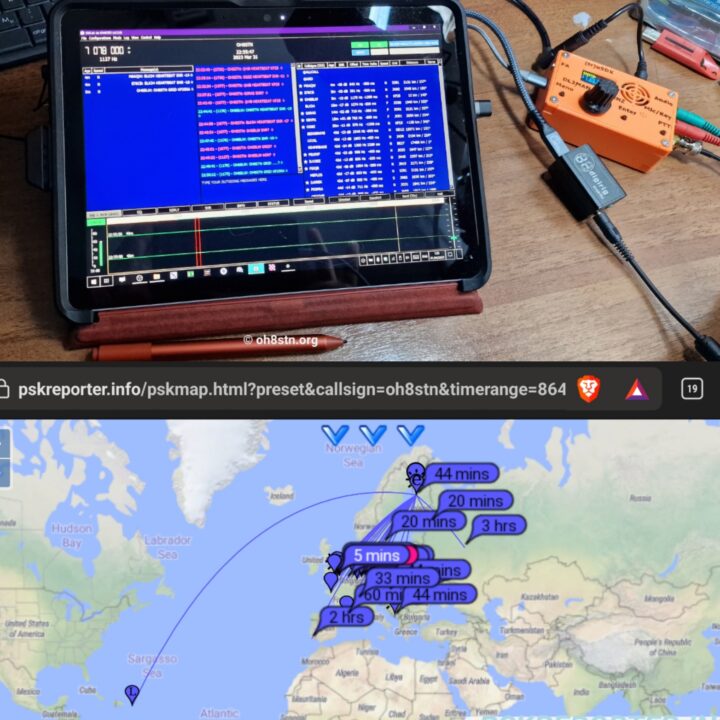
Running JS8Call has been a pleasure with the (TR)uSDX. I’m using Omni-rig as a rig control and the Digirig for audio. There were two issues with the (TR)uSDX and JS8Call (or any other mode). First, getting audio levels perfect was challenging. I mean it was difficult to achieve good outgoing audio levels. I was able to get it doaled in using a web sdr to monitor my own tramitted audio at distance. Another issue is the way VOX works generally speaking) on the (TR)uSDX. Whenever the rig is accessed via CAT control, eg for a band change, VOX is disabled. I solved this by not using VOX, and just focusing on manual PTT via CAT, or assigning the Digirig comms port for PTT via RTS. Either method is fine.
Once those issues were sorted, JS8CAll was a blast!
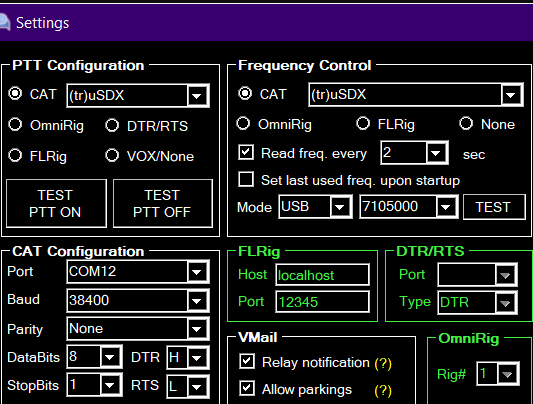
(TR)uSDX JS8Call Settings
For JS8Call, my set up utilizes Omni-rig for PTT & rig control. The Digirig is used for audio. While the vox is useable, manual PTT is preferred.
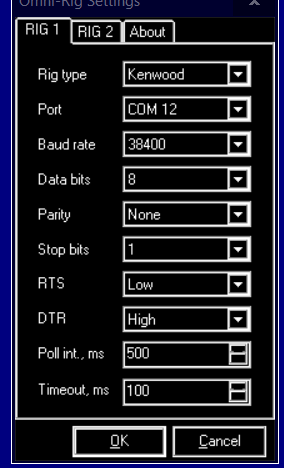
For this configuration, JS8Call uses Omni-rig for rig control. As such, Omni-rig should be chosen in the “Radio” drop down box of JS8Call Radio configuration. Omni-rig should be configured as either a generic or specific Kenwood radio. I chose TS-480 which works perfectly.
Running Winlink
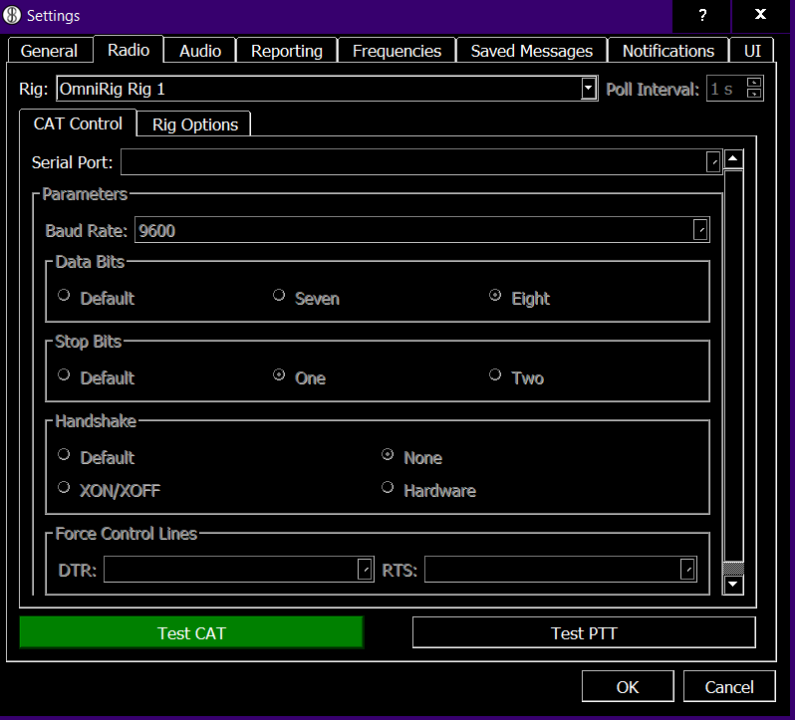
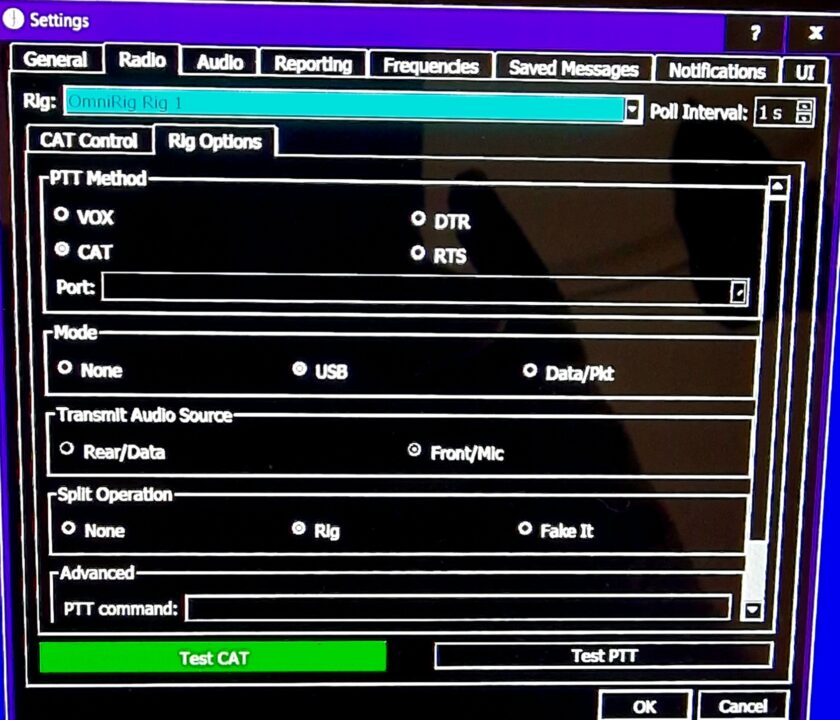
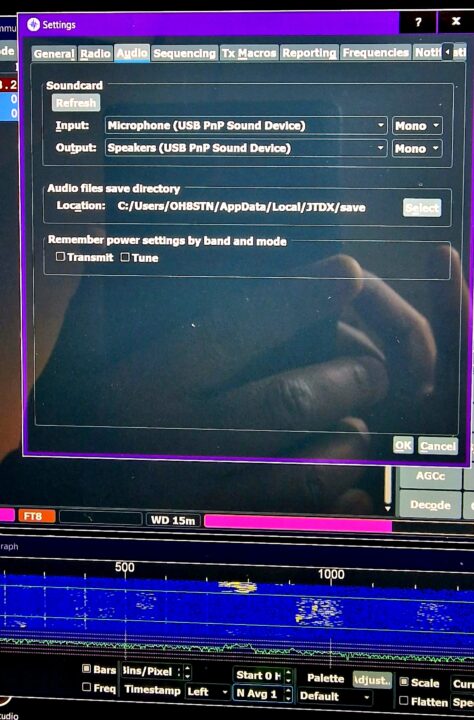
Winlink was quite easy to set up. It is difficult to understand the trouble some users are having, as read in forums and comments. I used the “Kenwood Radio” for CAT control, and the Digirig comms port for PTT. In VaraHF, I configured the Digirig as the microphone and speaker. The only difficult things (as with JS8Call) was getting audio levels correct.
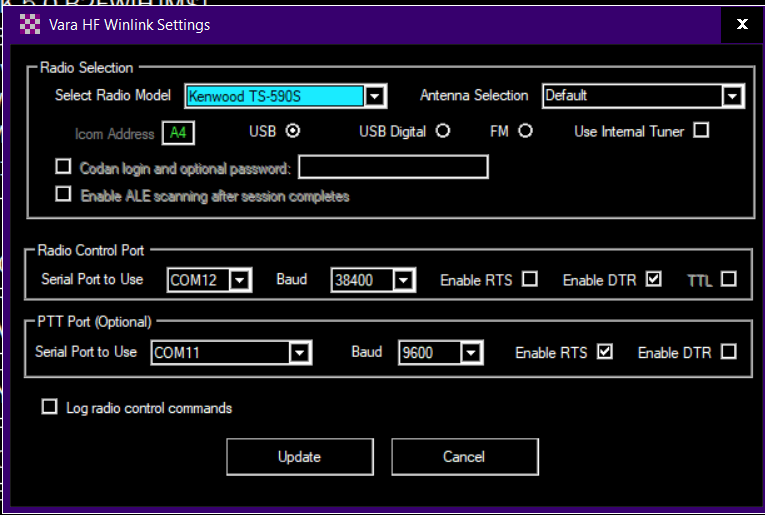
(TR)uSDX Winlink Settings
The Winlink setup is configured differently than JS8Call, WSJT-X, and JTDX. For WInlink, choose the “Kenwood Radio or Kenwood TS-590S” for rig control, and set the comm port to the (TR)uSDX comm port seen in your OS ports configuration dialog. For PTT, we will choose the Digirig comm port, and set RTS to High (enabled), and DTR to Low (disabled). If you are using VaraHF, set the mic and speaker interface to your Digirig. Be sure to disable AGC (auto gain control) in your OS sound card properties dialog.
Wish list: In the perfect world, a data modes version of the (TR)uSDX would be released with an integrated Digirig and a single USB cable coming out of the enclosure for both audio and CAT control. This is what the QDX was supposed to be. Hopefully we can help bring this “upgrade idea” to the community.
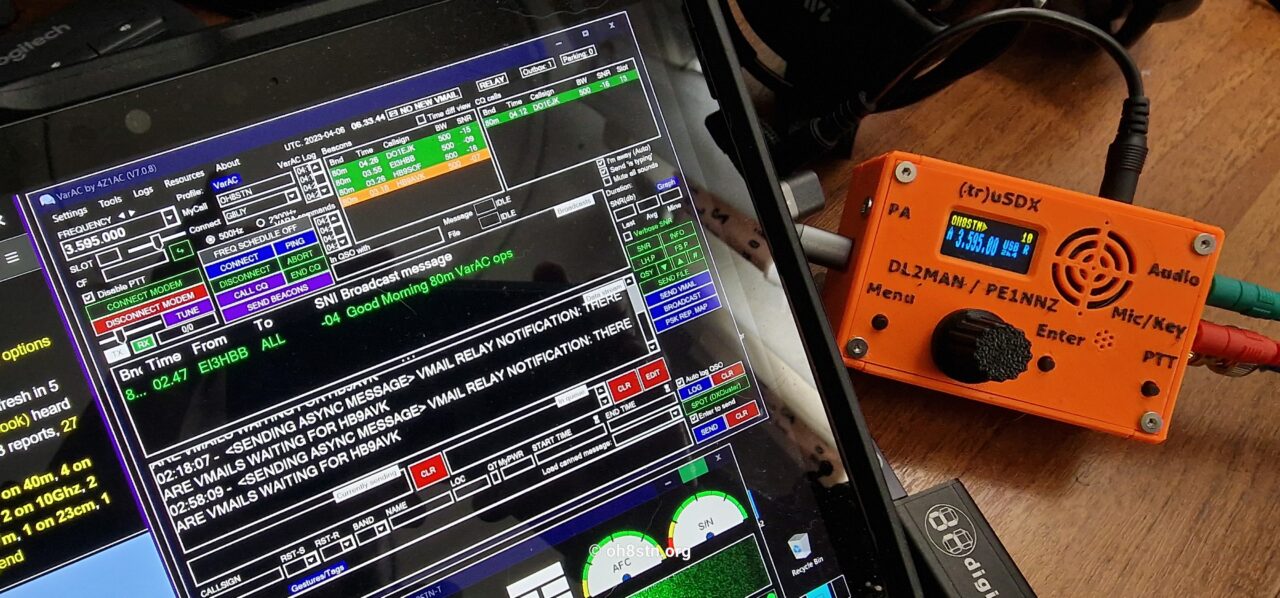
(TR)uSDX VARAC settings
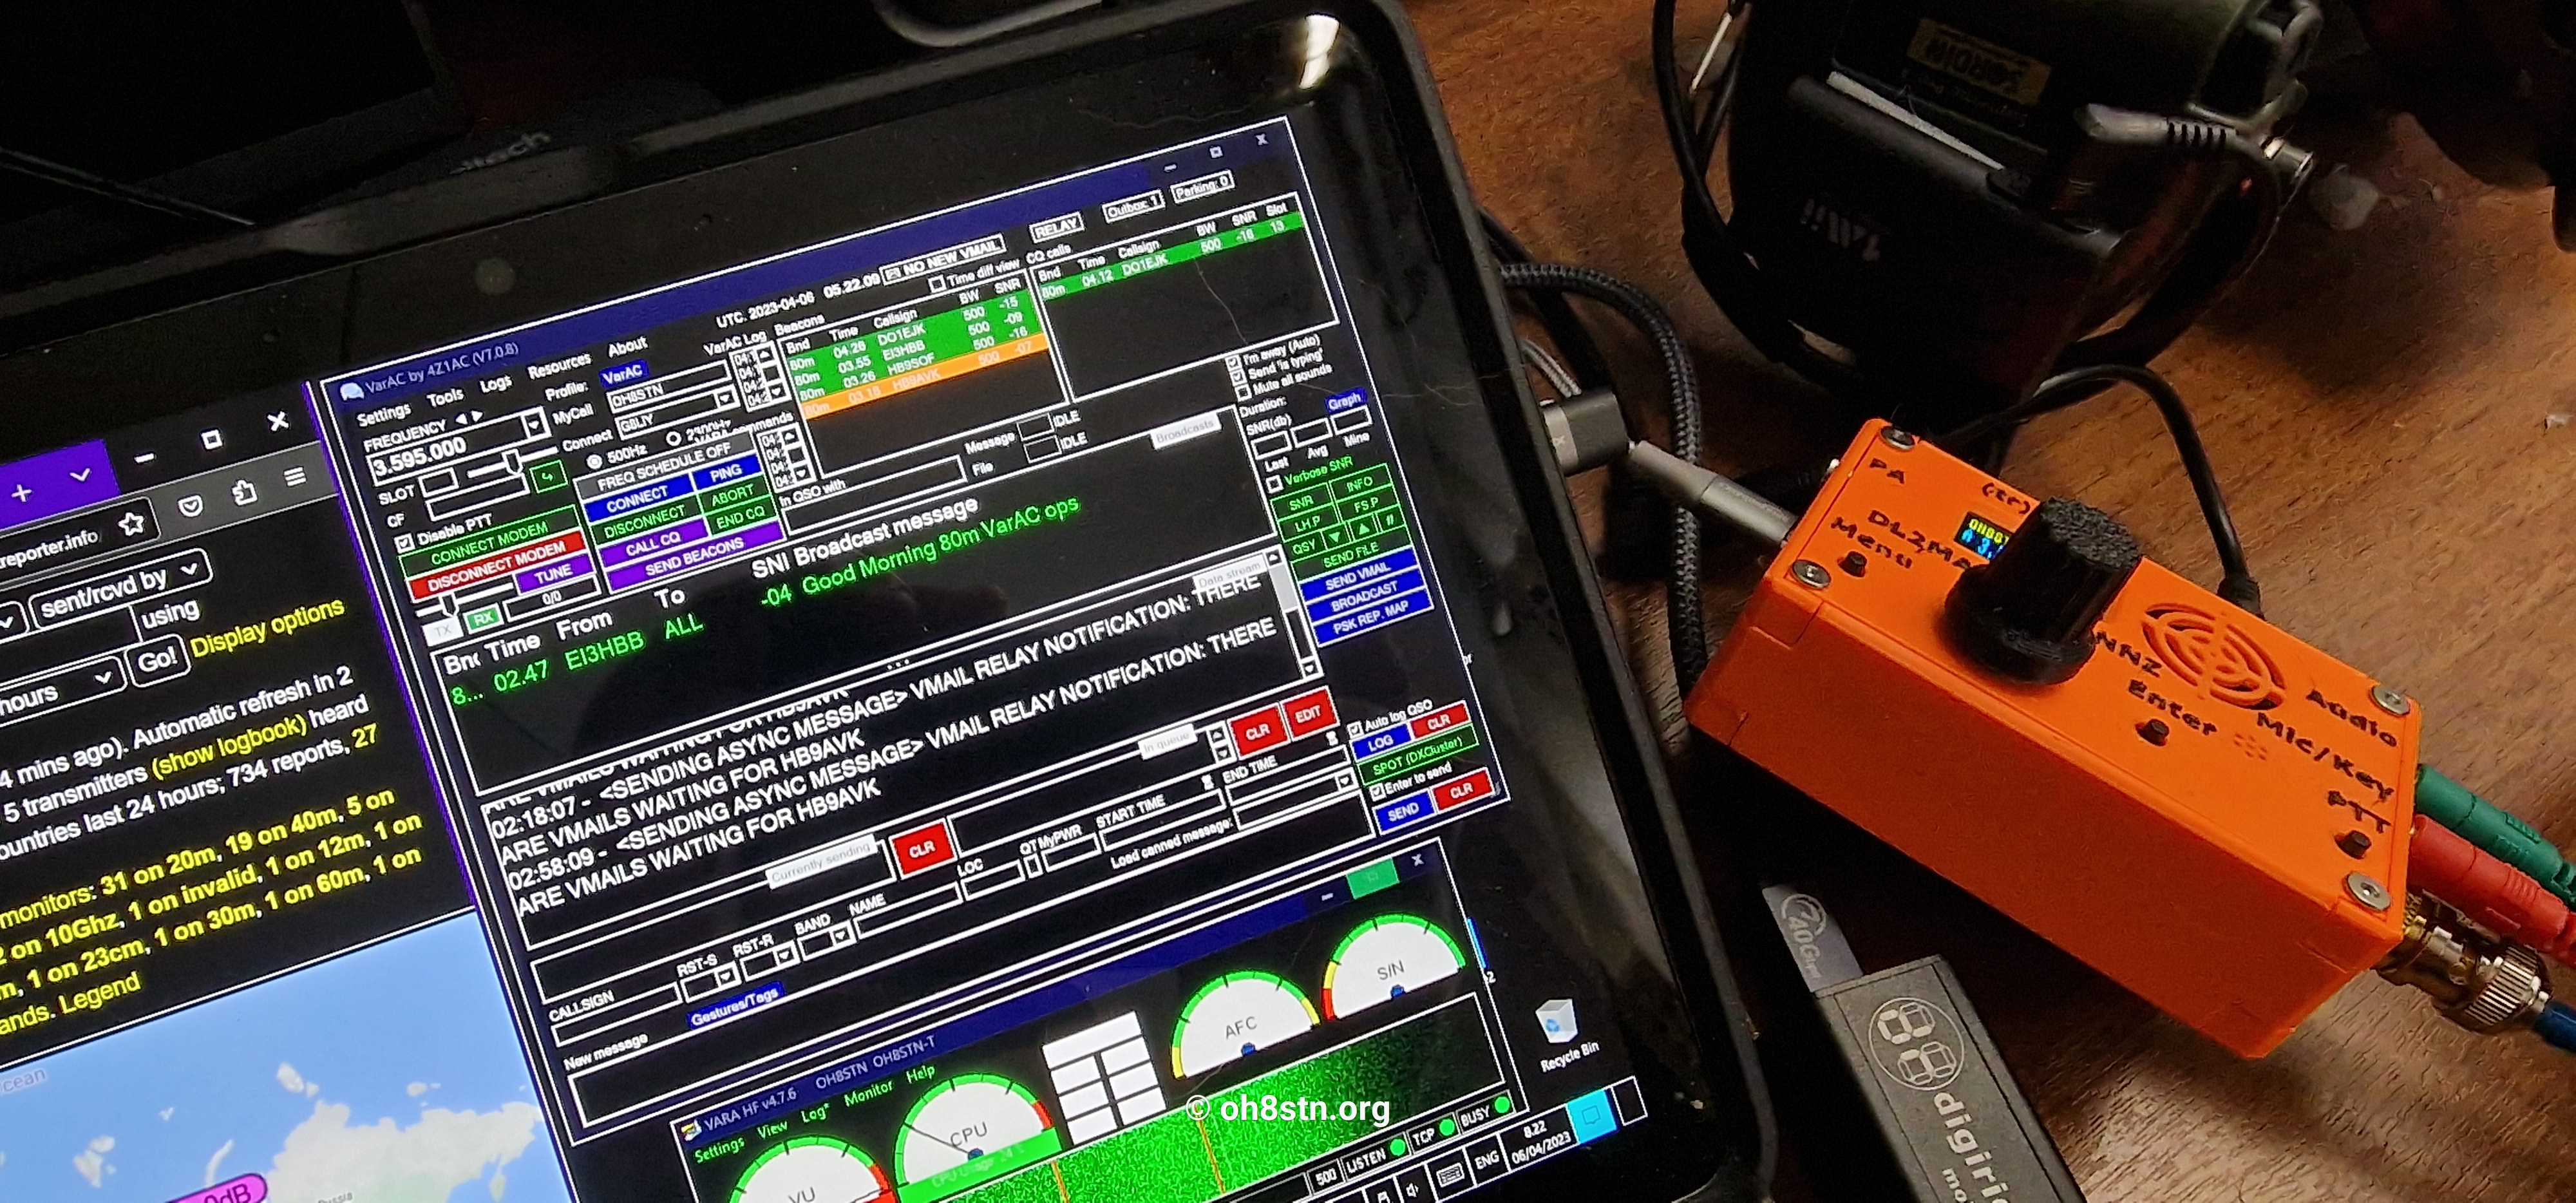
Although VARAC was the most difficult to configure, this was no fault of its own. I though it important to drop my experiences here. It is important to first say, no success getting Omni-rig to work with (TR)uSDX/VARAC! Go head and scroll down a couple of paragraphs to the solution. Alternatively, keep reading to learn from and avoid my mistakes.
Omni-rig and the (TR)uSDX don’t play nice with VARAC. Have not been able to troubleshoot this yet, so it is what it is. What I do know is, since Omni-rig was already installed and running on the background on my machine, VARAC could not access the (TR)uSDX commport (which Omni-rig was occupying). This seems like a no-brainer, but actually is no problem for any other application for example Winlink. A Winlink session window and Omni-rig politely negotiate which application has access to the same radio, as long as it is not at the same time. So even though a Winlink session has exclusive access to thre (TR)uSDX during a session, Omni-rig (running in the background) won’t block the port, unless another app is attempting to access the radio via Omni-rig. The solution was to open task manager, and kill omni-rig! Then configure VARAC to use CAT for PTT and frequency control. Keep this in mind if you are getting an error in thee VARAC CAT command log, about another app blocking the commport.
Got it working
Since I was not able to get VARAC to work with Omni-rig and the (TR)uSDX, I configured VARAC to use CAT,. This method directly accesses the radio, without an intermediary service (eg Omni-rig, FLRig, …)
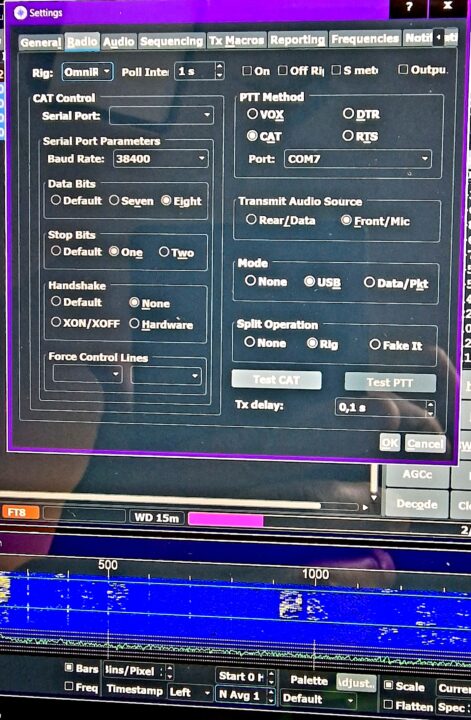
(TR)uSDX JTDX & Omni-rig settings
Since this is a brand new radio to me, testing started with JTDX (my primary data modes test platform). JTDX is a more user friendly fork of WSJT-X. It has a better user interface, easier controls, and has stripped out everything from WSJT-X not designed for FT8. It is also far more stable!
I decided to use Omni-rig as the interface between JTDX and the (TR)uSDX. This method is much more stable than trying to configure WSJT-X, JS8Call or JTDX directly through the radio cat control dialog screens in these apps respectively. The following are screenshots of the omni-rig configuration, and the JTDX config screens. WSJT-X, JS8Call and JTDX all have very similar config screens, so it should be easy to transfer these setting, to your own chosen application. As mentioned in previous paragraphs, VARAC setting were unique.
Microsoft Surface Go 2/3 Tablet
As mentioned in the video published last year, I have migrated to a Microsoft Surface for Ham Radio Data modes. The primary reason for the move away from the Raspberry Pi, was reducing the number of unique items carried, to make the Ri useable in the field. Sadly, the Raspi was too complicated, had too many components, and was too fiddly.
At the time of this post, I already had two Microsoft Surface Tablets. One was the Microsoft Surface Go 2, the other Microsoft Surface Pro 3. For this project I decided on another Microsoft Surface Go 2 (LTE variant), running a LITE & stripped down version of Windows. More on the OS later on.
I purchased to Microsoft Surface Go2 LTE because it has a built-in GPS. This was a hard lesson learned with the Icom IC-705, which doesn’t allow access to its internal GPS telemetry, over its wireless connection. Therefore, I went on ebay to find a second hand Microsoft Surface Go2 LTE, and actually found one. With the internal GPS, Winlink, JS8Call Tools, Robust Packet and all the other telemetry using modes I use, now all can get location data from the internal GPS, on the Microsoft Surface Go2 LTE.
Why not a Surface Go 3?
Being on a tight budget, the cost of a Surface Go 3 LTE brand new, would have crushed my budget. The Surface Go 2 LTE with an M3 CPU has better performance than my Pentium Gold Surface Go 2 model, and is easier to find second hand. Moreover, there have been complaints about reduced performance of the Pentium Gold Surface Go 3 variants compared to the Surface Go 2. My Pentium Gold Surface Go 2 has worked flawlessly for ham radio data modes, blogging, tutorial screen capture, … In fact, I am writing this blog on that machine right now! These are not gaming computers, but a heck of a lot more than “Good enough” for ham radio. If you choose an Surface Go 3, I would suggest the LTE/i3 variant with built-in GPS and faster CPU (just to be sure).
For everything you’d ever want to know about using a Microsoft Surface Go for Ham Radio, please read this post.
Why a Microsoft Surface?
Finally, the following video explains in easy to understand terms, my justification for switching over from a Raspberry Pi, to a windows based machine. I do have a raspberry pi based tablet which might fit the bill for many of you. Unfortunately, it required more time to prepare, test and document. It would certainly reduce our budget but unfortunately, would increase our headaches. If your heart is set on a non-Microsoft machine, I would suggest a Debian based Linux tablet or laptop (even a Surface running Linux).
FT8 & PSK on Android
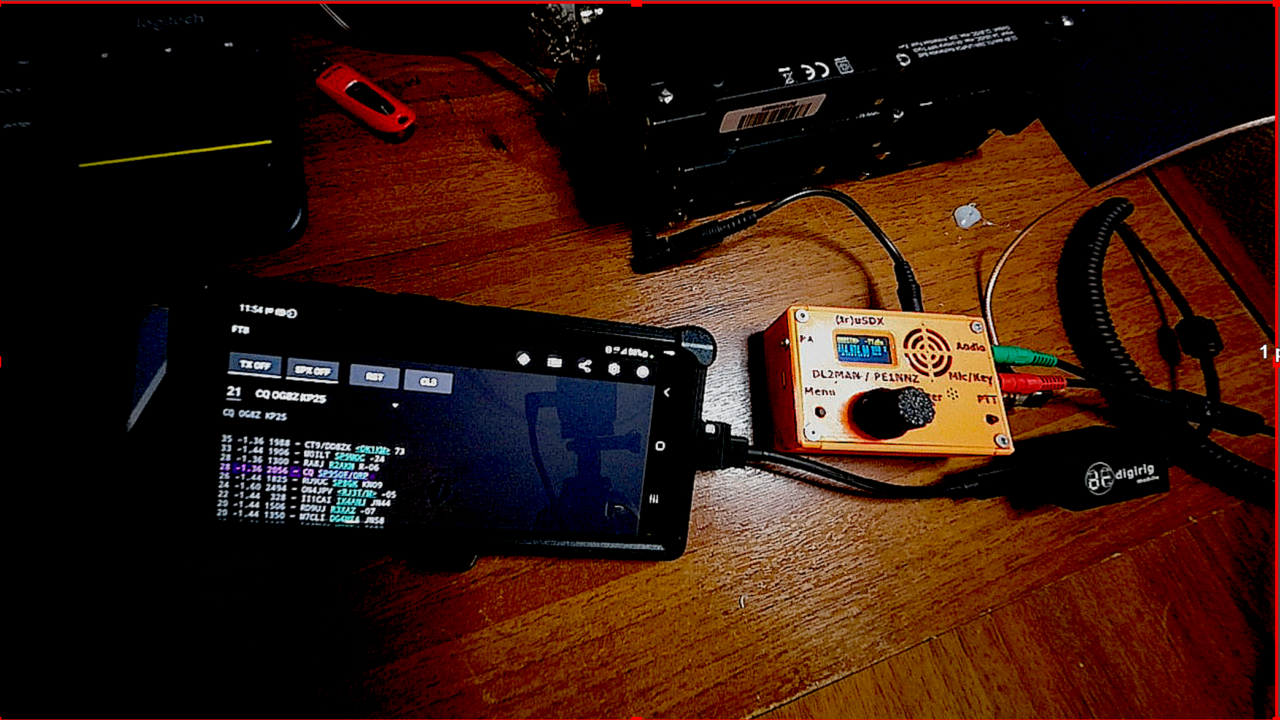
As an aside, if you have absolutely no interest in emergency communications or preparedness, but want to do FT8, this Android-based kit variant is significantly smaller. We already have apps for FT8, PSK31 or other modes on Android. Since the Digirig worked perfectly with my Samsung Galaxy S22 Ultra, Samsung S8+ and the FT8 Radio app, my station could really be as small as what you see in the picture above. A phone, radio, audio interface, battery, and antenna. Yes, the Digirig is Android compatible! Unfortunately there is no audio monitoring, but everything else works PERFECTLY for FT8, PSK, MFSK, RTTY, …
Food for thought!
DIY Pocket Portable Solar Generator
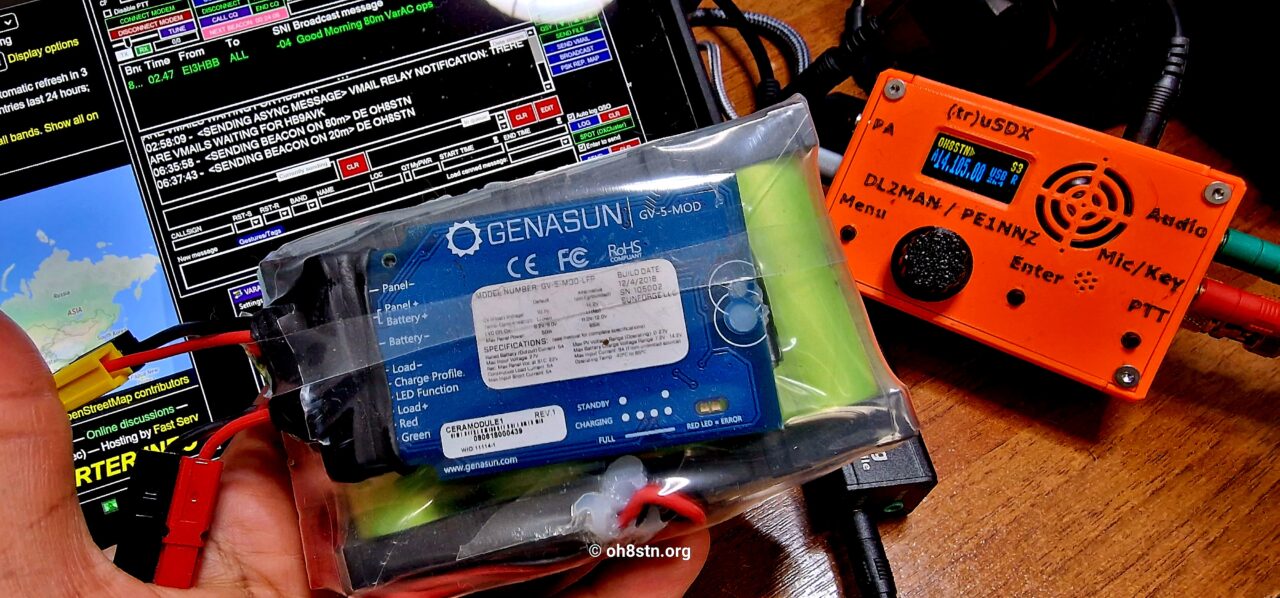
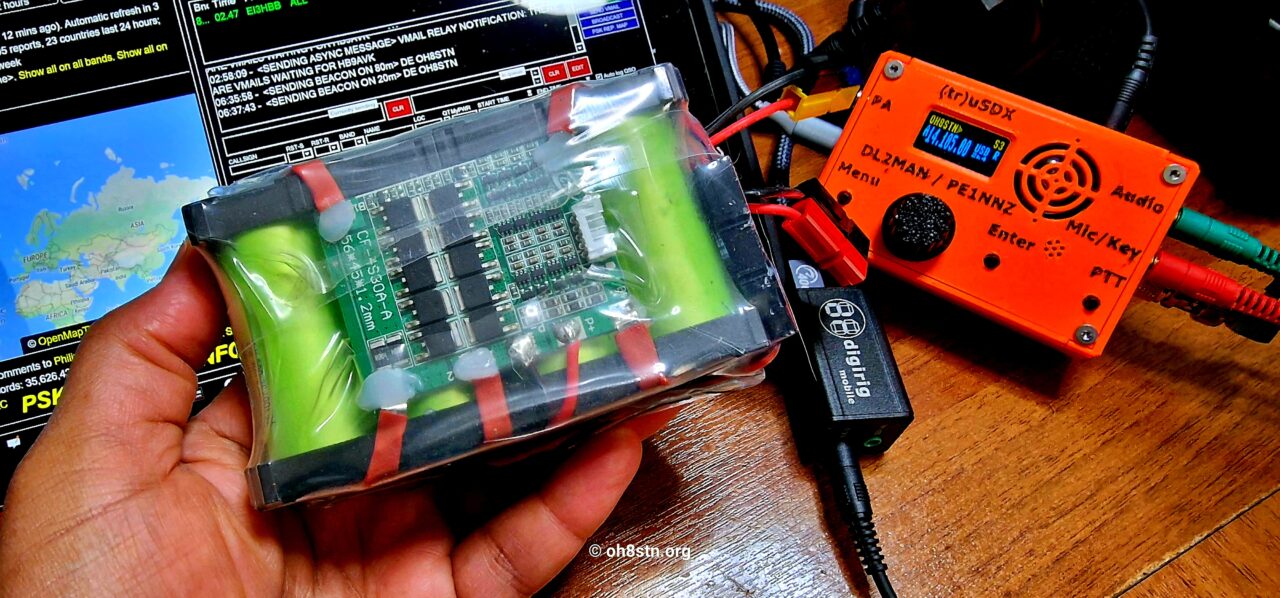
You may not have known how energy efficient the (TR)uSDX actually is. I can tell you, it is very energy efficient. More energy efficient than my beloved TX-500. The (TR)uSDX draws 80ma on RX, and 500mA on TX @13,8V typically at 85% PA efficiency. For regional communications, we can certainly do something with this. It also means we can use a very modest portable power supply to keep the rig powered up, for insane periods of time.
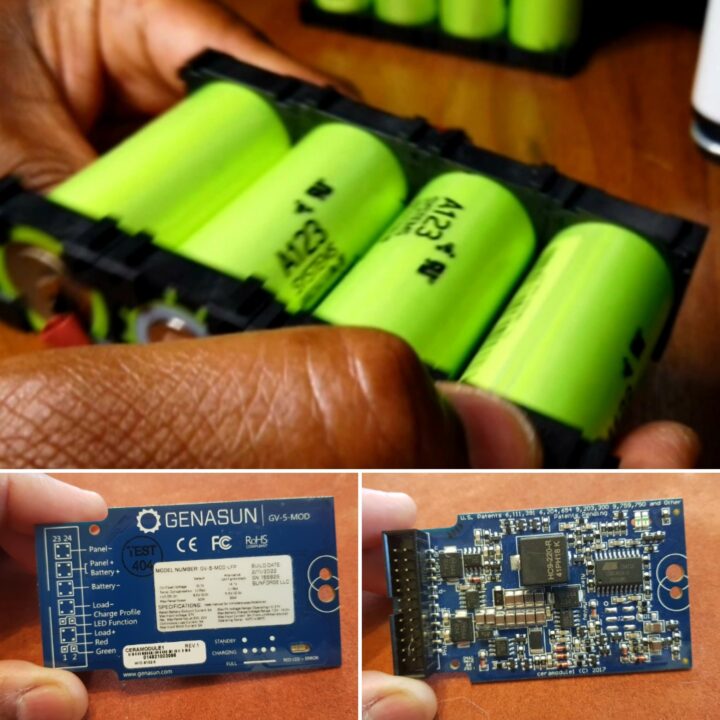
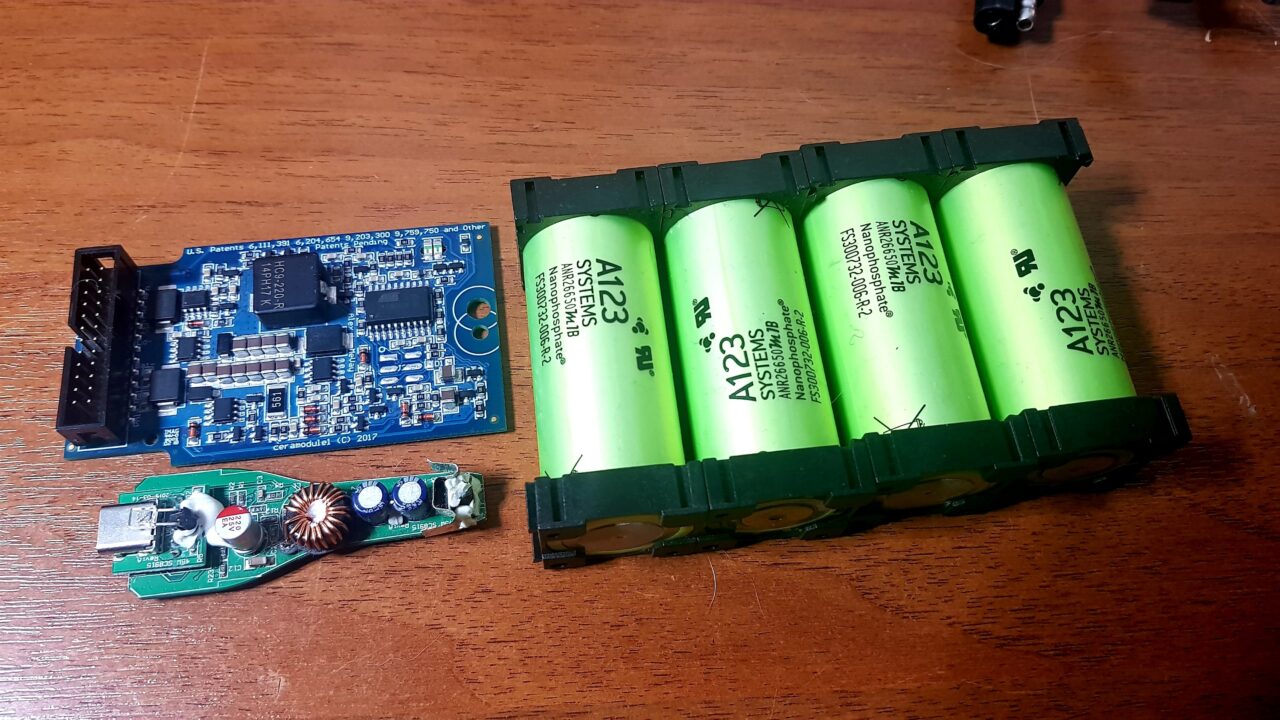
I suggest using something like my Pocket Portable Solar Generator build from the channel. It is an easy to build 4S1P LiFePO4 battery and charge controller, using easy to source cells from ebay or battery hookup. The pocket portable solar gen is about the size of a pack of smokes, and will power the (TR)uSDX for days at a time.
The following video will take you through design, sourcing the parts, and putting it all together. The pocket portable solar generator is an excellent pocket-sized power supply, for times when anything larger would be too much. So far it has powered my Icom IC-705, Xiegu G90, Xiegu X5105, Xiegu X6100, Lab599 TX500 and the Yaesu FT81x.
It is also possible to use some pre-built comercial battery, if that is more your speed. Keep in mind, any ham radio operator has the technical skills to put together such a simple solar gen, as my Pocket Portable Solar Gen project. It is the easiest DIY portable power supply on the channel so far.
Antenna Strategy
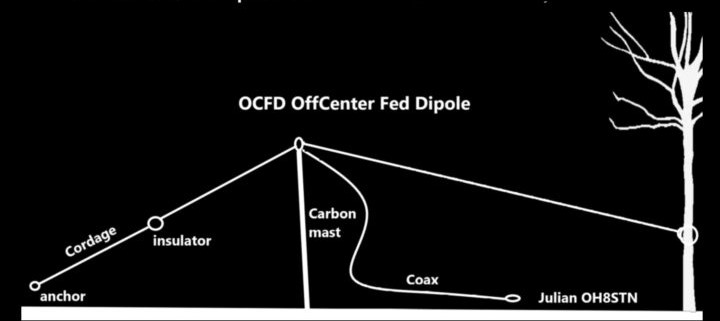
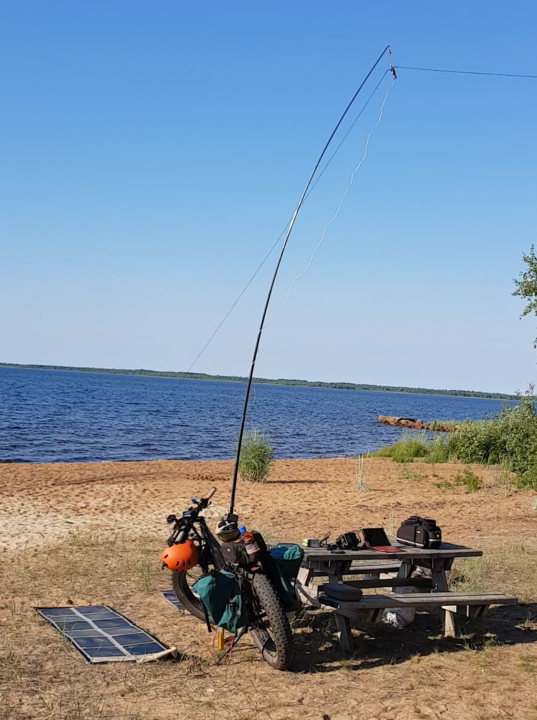
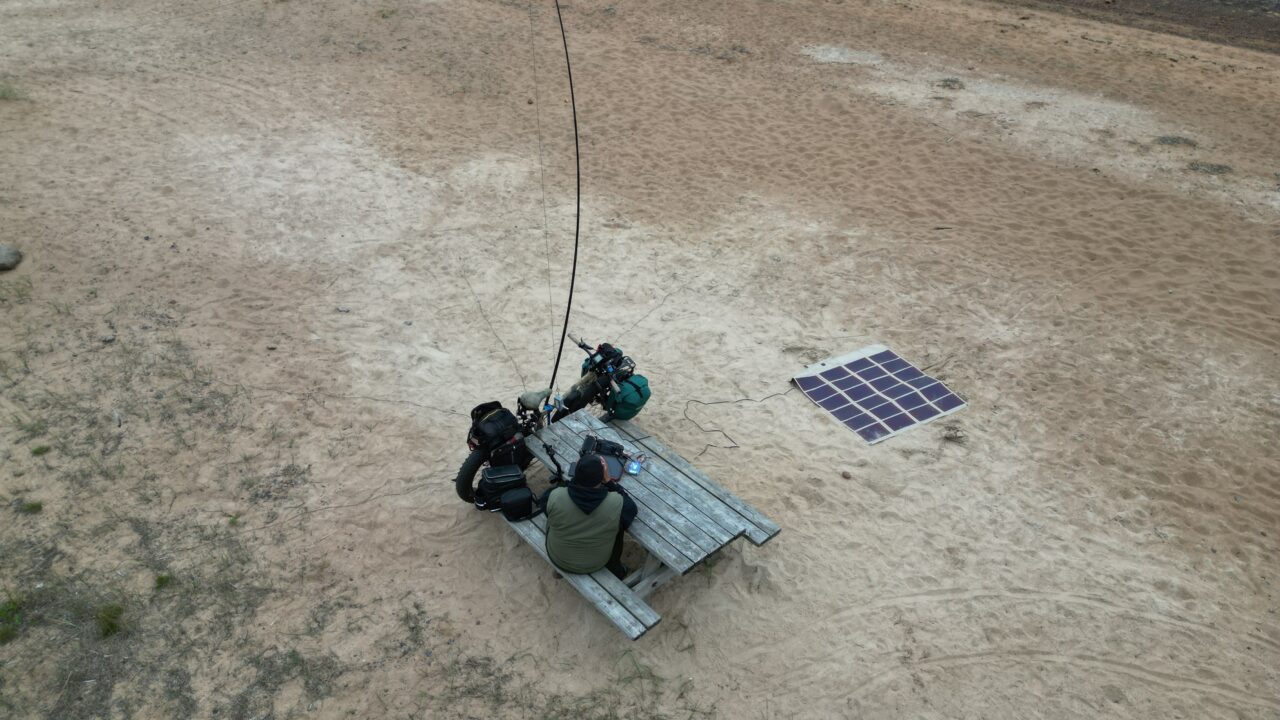
Since publishing my man-portable antenna strategy video in early 2023, I have come to rely on antenna designs from Tim Ortiz N9SAB. In the following images, you can see the off center fed dipoles set up “fat bike portable”, with a carbon fiber fishing pole. These antenna work great! There are all kinds, meeting a variety of antenna strategies, so give them a try (links below).
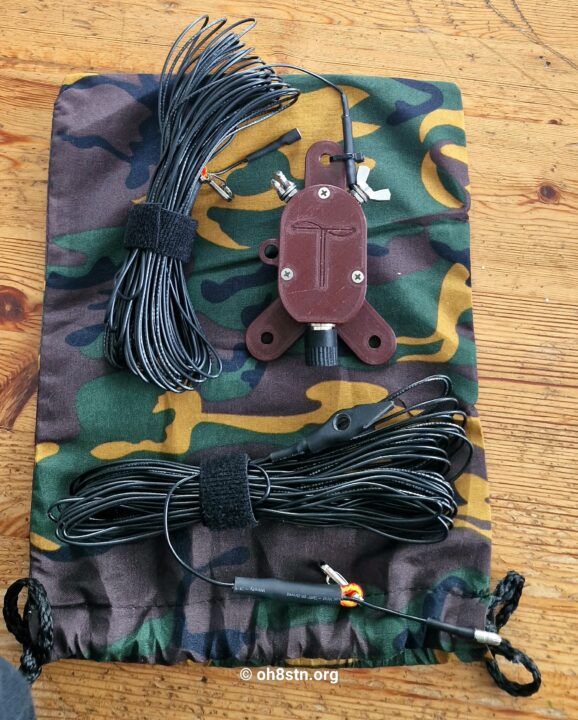
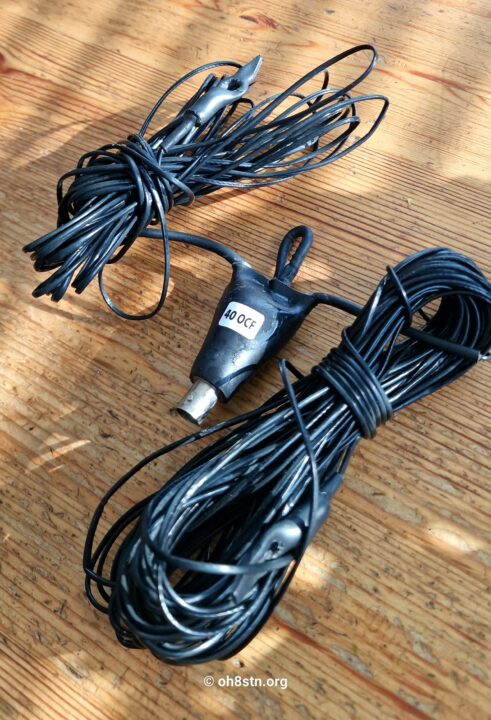
The (TR)uSDX covers 80, 60, 40, 30, and 20 meters. Sadly, we can’t cover all those bands with a single RESONANT, wire antenna. Therefore, my plan is using two wire antennas, in several configurations. One OCF or EFHW antenna covering 80, 40, & 20 meters, with the second OCF or Linked Dipole antenna covering 60 & 30 meters.
WARC bands are critically important to low power portable operations. Normally on the contest bands, a low power station be drowned in the noise. The WARC bands do no allow contests! As such, are much more forgiving to low power operations. Food for thought!
The following antennas are from Tim N9SAB. These are the current models I have to work with. They arrived after publishing this article, so their addition is an update. have three different models. An 80 meter off center fed dipole covering 80, 40, 20, 15?, & 10 meter. Then we have a 60 meter occ center fed dipole covering 60 & 30 meters. This antenna is extremely important for man-portable QRP operators, as it gived us access to the WARC bands, where low power is appreciated. Finally, the third antenna is the random wire end fed. This is a sort of broad band antenna which can be used with a tuner to dial in a variety of bands. Despite what I say later in this article, These are my three options on the table at the moment.
Size, weight, power handling, and robustness are all important factors in choosing these antennas. Even primarily operating QRP, there are times when one might use more power. A QRP antenna only handling 10 watts on data modes, may not be a wide investment. These N9SAB antennas are are an excellent compromise between the extremely rugged but heavy Chameleon antennas, and the low power spec of other popular SOTA antenna designs.
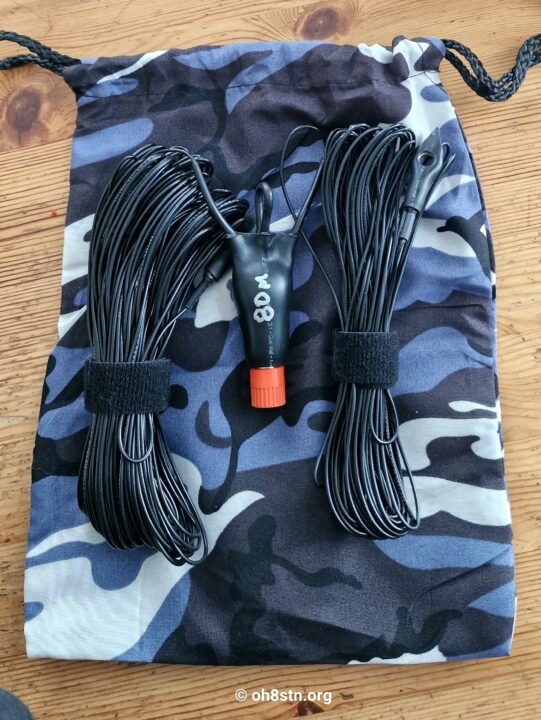
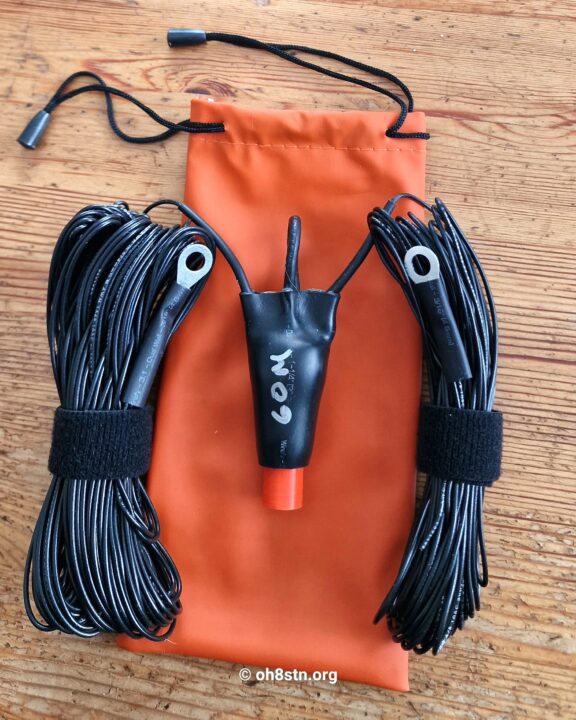
Original Off Center Fed 40 meter (OCF40)
Just in case anyone thinks I’m dishonestly peddling antennas, here is a bit of historical context for you. The images underneath this text are the original OCF40 antenna reviewed in the video. The images with the fatbike are from the day of the review video. The image on the table, shows the OCF40 after spending the entire winter (October 2022 to April 2023) at 65N, as one of my fixed station antennas at home. This antenna not only took half a year of testing man-portable, it then went up as a fixed antenna, surviving the harsh Finnish winter. The antenna is perfect! There is no stretching, degradation of wire, or moisture ingress into shell. When I say I have an antenna strategy, the strategy means the antenna must survive in these harsh conditions, at 65N! I will never buy an antenna from “some YouTuber” on Amazon, as long as his only proof of antenna robustness or survivability, is done in the warm pleasant climate of southern California! Show me your antennas water ingress protection. Show me how the wire holds up in double digits below freezing. Show me how it has held up after a season in the harsh winters of the Arctic! If one can show me that, I’ll consider that antenna. Until then, the N9SAB antennas are a perfect match for my antenna strategy.
For NVIS communications, and flat top horizontal dipole at one eighth wavelength in height, will do a treat for local to regional comms. Even an inverted vee config with the apex at one eight wavelength will work , albeit with some losses. In the images above, I am testing NVIS on 40 meters during the day, with on off center fed dipole. Results were great! You’ve probably already seen the video, but had no idea of the context.
The Plan
An antenna for 80, 40, 20 meters is easy beans. An antenna for 60 and 30 meters might not be that difficult either, but could be considered “an oddity”. I have decided on using two wire based antennas from my recent “man-portable antenna strategy” video. These antennas are small, lightweight, easy to deploy, and take up less space than any non-resonant, broadband (multi-band) option. Using two resonant wire antennas will provide better performance than eg a random wire end fed. A random wire end fed which also requires an antenna tuner by the way. With so low power, efficiency is critical! I’ll consider the random wire for other projects. For this one, I’ll stick with resonant wires.
Thinking out loud.
If a broadband antenna provides an SWR across HF <2.5, what happens to the reflected power which doesn’t go out the antenna? It’s lost as heat isn’t it!? With a resonant antenna, we can operate a lower power station, but get the same amount of power out of the antenna, as a station running more power. The difference is, we are using a inefficient antenna. At higher output power, antenna losses are less critical. At QRP power levels, efficiency is absolutely critical!
The following video goes over my man-portable antenna strategy, demonstrates problems using broadband antennas, and goes though my best choices for lightweight wire antennas, requiring no antenna tuner. The video does a much better job explaining the antenna strategy, than I could ever put in words here.
Budget breakdown
The project budget is $1000 USD.
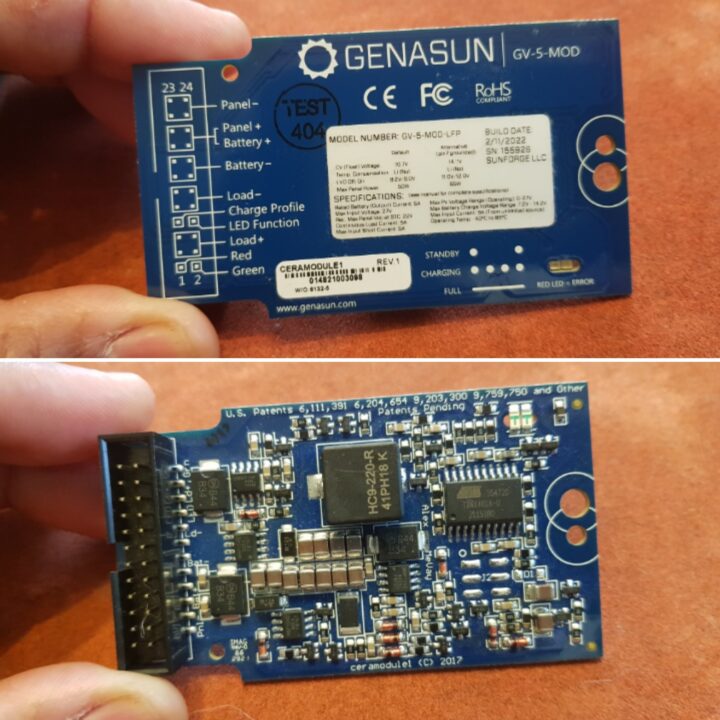
The radio was chosen for its low cost and good receiver. Having low current consumption was also a bonus. The audio interface was chosen for its size and capabilities. Being able to use it with other rigs makes it a better value. The Surface Go 2 LTE was a big expense, but worth it IMHO. No difficult Raspberry Pi scripts or compiling source. We have an all-in-one solution that can be charged in the field, and is easy to work with. The pocket portable solar gen was another “big” expense. The Genasun GV-MOD controller made it more expensive, but also provides renewable charging in the field. Remember, a battery you can’t charge in the field is a boat anchor! Finally, the antenna(s). I spent a good amount of money for a waterproof, pre-assembled antenna for 80, 40, & 20 meters. We can reduce the overall cost of the project by building ourselves. On the flip side, I prefer to use my time in other ways, so the value (for me) was justified.
Here’s the breakdown.
- HF Radio $120 ($88 if you build yourself)
- Audio interface & Cable $49.97 + $19.97
- Microsoft Surface Go 2 LTE $420
- Pocket Portable solar Gen. $140
- 80M OCF dipole $139.95 & 60M OCF or linked dipole TBD
Total $889.89
This is an enture HF NVIS Data modes QRP go kit for under $900 bucks. Radio, computer, antenna, power supply, audio interface. Each aspect of this go kit will be demonstrated in an upcoming video. I seriously believe we have supassed ourselves with this kit!
Links
- (TR)uSDX ebay (TR)uSDX (https://ebay.us/wSRAI2)
- Tablet Computer eBay Microsoft Surface Go2 LTE (https://ebay.us/v5GuMU)
- 80M Antenna 80M OCF dipole eBay N9SAB 80-6M OCF (https://ebay.us/SPwYJH)
- 60M Antenna TBD
- Audio interface Digirig Mobile for (TR)uSDX Radio GigaParts http://oh8stn.net/digirig-usdx
Other stuff
You may want to pick up a few things more. Here is a list of things which may not be critical now, but nice to add later on.
- Headphones – I already had a nice set up headphones, used for portable ham radio. I wrote a blog about them called Rugged Headsets for portable ham radio. I use the Sordin Pro X Supreme which is both rugged and waterproof.
- Microphone – For data communications, a microphone is not really needed. For times when someone insists on a phone QSO, a microphone will be required. The internal microphone on the (TR)uSDX is usable but sounds terrible (but readable). An external mic could make a difference.
- Molle admin pouch – A molle admin pouch for your tablet, radio, Digirig, cables, … will keep things organized. Is there anything else to add? I know bags inside of bags can quickly get frustrating, if no color coding is used to organize them. Use color coding to keep the kits organized and easy to find.
Who is this kit for?
Ultimately this kit is for anyone who wants a starting point which is not going to break the $1000 bucks mark for a portable data station. This go kit is also great for someone who wants a second man-portable go kit, without investing thousands of bucks, duplicating another costly field data comms go kit. Lightweight and extremely portable, this could be a man-portable WInlink go kit, we take along backpacking. It will definately have a place in the saddle bags of my fat bike, without breaking the bank.
Food for thought
In todays world, western currencies are losing value, the cost of shipping is increasing, and every penny counts. It is ridiculous to think we will each have multiple rigs at over a grand each, as we did back in the day. Multiple laptops, multiple portable power kits, … For the working class Operator living a frugal lifestyle, we can make due with a budget-friendly go kit like this one, as a primary or secondary set-up. Moreover, supporting the designers and manufacturers of kits like the (TR)uSDX may help them bring other budget solutions to the community. I would love to see a data modes version of (TR)uSDX with integrated audio interface for example.
Full capability Ham Radio data is never going to be “cheap”! There are those Operators who say it “can be” cheap, by building our own CW-only radio. Statements like these are true! Sadly, limiting a radios functionality to a single mode in order to reduce the price may bolster the ranks of CW-only ops, but it does not help us achieve the asynchronous data communications we are striving for.
At the moment, the only way to get full featured HF data communications in the field, is with a radio and computer or radio and smartphone. Yes, we need more Android development for HF Data. What about embedded PSK or RTTY? Built-in decoding of PSK or RTTY is just a gimmick! It is used to pad the feature list of radio manufacturers. The decoding would be more useful with practical messaging modes, embedded directly in the radio. For example embedded ALE or SELCAL, embedded Winlink, Embedded JS8call or even embedded FT8. When I see this possible with an Android device and a radio, that’s when I’ll get excited 😀
For now, the most feature-rich approach for a budget data modes go kit, is a radio, tablet or laptop, and portable power supply.
73
Julian oh8stn
Buy my book Grid Down Emergency Communications on Patreon or Ko-fi
YouTube: https://www.youtube.com/@oh8stn
Rumble: https://rumble.com/c/OH8STN
Blog: https://www.oh8stn.org
Looking for ways to support the blog & channel?
Buy my book Grid Down Emergency Communications on Patreon or Ko-fi
Support the channel by shopping on Amazon, ebay, at Battery Hookups or GigaParts.
For GigaParts and Battery Hookup, use my callsign for a small discount.
Alternatively, drop a little something in the TipJar. It really makes a difference.
- OH8STN on Patreon: http://www.patreon.com/oh8stn
- Join YouTube channel member: https://oh8stn.net/YT_
Disclosure: Some of the links below are affiliate links. This means that, at zero cost to you, I will earn an commission if you click through the link and finalize a purchase.
- Buy me a rootbeer https://www.paypal.com/paypalme/oh8stn
- Buy me a coffee https://buymeacoffee.com/oh8stn
- GigaParts: https://oh8stn.net/GigaParts
- Shop at Battery Hookup: https://oh8stn.net/batteryhookup
- Shop on Amazon: https://amzn.to/3P9Zq28 #sponsored
- Shop on eBay : https://oh8stn.net/ebay #sponsored
Buy an N9SAB Antenna on eBay https://ebay.us/OVVZcG #sponsored

Outstanding overview, I’m looking forward to the videos. I know that expanding asynchronous capabilities will be critical in the future (and present). Finances are tight everywhere — and will become even more so, quicker than most assume (it is already happening in Japan). Careful reading between the lines provides answers, and one can find a way for what one needs where one is. For example, 60m in Japan is verboten for TX so antennas become easier. A little hard thinking and a bit of tinkering with an analyser and soldering iron can lead to light-weight wire wonders. Keep this series going! 73 Garu
Thank you!
Sadly manyvofcghdse tipez if posts, go misunderstood. Despite how much pressure the boots are putting on the back of our necks, people don’t react react.
73
Julian oh8stn
Julian, out of the park as usual! Your review ties it all together. I have been using just such a combination for about a month and am very happy. The (tr)uSDX, which punches well above its weight class, and Digirig work perfectly with VARA, ARDOP, Winlink Express, JS8Call, and VarAC on my MS Surface GO3. No complaints here. For a less expensive but more laborious approach, the (tr)uSDX, Digirig, and above programs also work on my used MS Surface GO (version zero, eBay, about 150 USD) running Linux Ubuntu 22.04, having wiped Windows. The Linux installation gives the older Surface GO comfortably sufficient performance (I’m using it to type this, stream your videos, etc.) WheezyE’s “Winelink” Winlink/VARA/VarAC package install for Raspberry Pi, repurposed to the Surface GO, works with the Intel x86_64 processor. Though I must say the Windows setup on the Surface GO3 seems more stable and reliable as one would expect. JS8Call runs in Linux/Ubuntu with Crossover. A homemade 40M EFHW with homemade mini 49:1 unun and AWG 26 wire is cheap and effective as an NVIS antenna, and a small homemade 80M coil and tail can be optionally added. Tablet OS choices aside, the tablet/(tr)uSDX/Digirig combo is, as you say, a realistic hyper portable expeditionary HF setup that works. Great tip on the internal GPS on LTE equipped Surfaces. I wonder where I put my IC-705. 73, Mark
Outstanding comments Mark 👍
73
Julian oh8stn
Geese. Thanks, now I have to spend more money and hide the packages from momma 😉 teasing going to try and duplicate
My wife says “happy man is a good man” 🤣
Did I miss the second half of the video? I am anxiously following the progress and am so curious to learn all I can about the BAT500. Thank you!
No you didn’t. Oliver had to go on a worktrip, so we’ll publish the second part of the video later on. Currently i’m working on the n v I s go kit video.
73
Julian oh8stn
I just took delivery of the (tr)uSDX based on of your review. I am excited to take it out into the field! The size and power saving is a big plus!
My goal has been multi-night kayak trips and now my CPAP is the largest consumer.
Thank you for the great videos!
Indeed this is an exciting radio. I hope it’s everything we’ve imagined.
73
Julian oh8stn
Thank you so much for this, Jullian!
I ditched all of my expensive, power-hungry HF radios this summer. I sold them all. I haven’t replaced them yet. Not the smartest idea, but I was fed up and I had a 12AH battery).
I’m building this exact kit currently.
The radio is on the way. The DigiRig is on the way.
A new 10Ah battery is on the way.
I have a Chameleon CHA TD that I got years ago. I took my dipoles down in my backyard and ran that kit exclusively for 2 years. I made contacts all over the world. I know how to best utilize it so I will continue using it for now, however I do want to downsize that as it is overkill (and heavy) for this setup.
I have some Walker Game Ear headphones that I’ve used for a long time. Shooter headset. I can plug my radios into them to hear the radio and ambient noise. They’re great, compact, and light! I replace the batteries once a year.
I am going to get the same surface that you listed. For now, I’m using my laptop.
Pro Tip: On microsoft’s website you can get the Surface Go 2 with LTE REFURBISHED for around $220 right now. Comes with a warranty and all. Don’t forget to check there vs eBay prices.
When I get all of the pieces (looks to be 2nd week in December) I will send you a Winlink from that setup at home and then out in the field. Thanks for keeping my inspired to be better and do better. I wish I had a friend like you in real life here. Would be fun. Say hi to Snapper for me. He looks like such a good boy!
Thanks 👍 73 de Julian